

The 5×7 Problem – You walk into your bathroom and immediately feel claustrophobic. The walls seem to close in. There’s nowhere to put anything. You bump into the sink when you open the door. Sound familiar?
You’re not alone. The average bathroom in American homes built before 2000 is only 35-40 square feet (roughly 5×7 or 5×8 feet). That’s smaller than most walk-in closets.
But here’s the good news: You don’t need to knock down walls to make your bathroom feel spacious.
Over the past five years, we’ve transformed over 150 small bathrooms through our bathroom remodeling services in WA area. We’ve learned exactly what works—and what doesn’t. Some changes cost $50. Others require a full remodel. But all of them create the illusion of more space.
Let me show you how.
Understanding the Psychology of Space
Before we dive into specific strategies, let’s talk about how our brains perceive space.
Your bathroom feels small because of:
- ❌ Visual clutter
- ❌ Dark colors that absorb light
- ❌ Interrupted sight lines
- ❌ Low ceilings or poor lighting
- ❌ Chunky, oversized fixtures
It feels spacious when:
- ✅ Your eye can travel uninterrupted
- ✅ Light bounces around the room
- ✅ There’s a clear floor space
- ✅ Everything has its place
- ✅ Proportions feel right
The strategies below address all of these factors.
Part 1: Quick Wins (Under $500)
These changes make an immediate impact without breaking the bank.
Strategy #1: The Mirror Multiplier
The concept: Mirrors double what you see, instantly making the space feel larger.
What works:
- Large wall-to-wall mirror above the sink
- Floor-to-ceiling mirror on one wall
- Mirrored medicine cabinet (adds storage + reflection)
What doesn’t work:
- Small decorative mirrors scattered around
- Dark-framed mirrors that create visual weight
- Mirrors positioned where they just reflect clutter
Real example:
We replaced a 24″ wide mirror with a 48″ wide frameless mirror in a Kirkland bathroom. The homeowner said: “It completely changed the room. I can’t believe it’s the same space.”
Cost: $150-$500 for materials + installation
DIY difficulty: Easy
Impact rating: 9/10 ⭐⭐⭐⭐
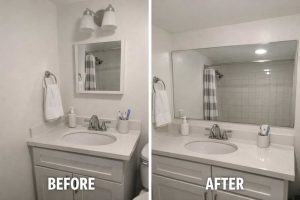
Pro tip: Position mirrors to reflect light sources (windows, light fixtures), not just walls.
Want to see more mirror transformations? Check out our gallery for before-and-after examples.
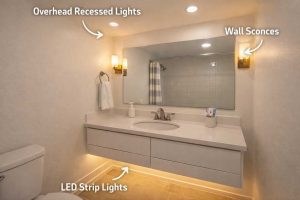
Strategy #2: Lighting Layers
- The problem: One ceiling light creates harsh shadows and makes the room feel cave-like.
- The solution: Multiple light sources at different heights.
The winning combination:
- Overhead lighting (recessed or flush mount)
- Vanity lighting (sconces or above-mirror)
- Accent lighting (toe-kick LEDs, shower niche lighting)
Specific recommendations:
Instead of: One 60W bulb overhead
Try: 3 recessed LED lights (4-inch) + 2 vanity sconces
Instead of: Yellow warm lighting
Try: Bright white (4000-5000K) for daytime brightness
Real example:
A Bellevue bathroom felt dark and cramped with one ceiling light. We added:
- 3 recessed LED lights
- 2 wall sconces flanking the mirror
- LED strip under the vanity Result: “It feels like a spa now!” – Client testimonial
Cost: $200-$800 (DIY) | $500-$1,500 (professional)
DIY difficulty: Medium (electrical work)
Impact rating: 8/10 ⭐⭐⭐⭐⭐
Pro tip: Add dimmer switches. Bright light in the morning, softer light for evening baths.
Strategy #3: The All-White (or Light) Palette
The science: Light colors reflect more light, making spaces feel open and airy.
What works:
- Walls: White, soft gray, pale blue, light beige
- Ceiling: Always white (reflects maximum light)
- Floor: Light tile or wood-look (more on this later)
What doesn’t work:
- Dark colors (navy, black, charcoal) in small spaces
- Busy patterns that create visual noise
- Too many different colors (stick to 2-3)
The monochromatic trick:
Use varying shades of the same color family. Example:
- Walls: Benjamin Moore “Chantilly Lace” (white)
- Vanity: Light gray
- Floor: White marble-look tile
- Accents: Chrome fixtures
But what if you hate all-white?
You can add personality with:
- One accent wall (the wall you see least)
- Colorful towels and accessories (easy to change)
- Natural wood tones (warmth without darkness)
- Plants (add life and color)
Cost: $100-$400 (paint + supplies)
DIY difficulty: Easy
Impact rating: 7/10 ⭐⭐⭐⭐
Pro tip: Paint the ceiling the same color as the walls (usually white). This eliminates the visual “cap” that makes ceilings feel lower.
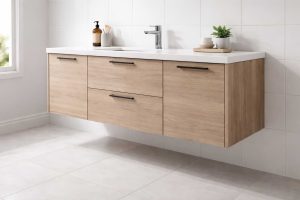
Strategy #4: Clear the Floor
The concept: Visible floor space = perceived space.
Quick changes:
- Wall-mount the toilet (if remodeling)
- Floating vanity instead of floor-standing
- Wall-mounted towel bars instead of floor stands
- Remove bath mats (or use minimal ones)
The difference this makes:
Before: Vanity sits on floor, taking up 24″x18″ of visible space
After: Floating vanity shows 24″x18″ of floor underneath
Your brain sees more open floor and thinks “bigger space.”
Real example:
In a Sammamish bathroom, we replaced a bulky floor vanity with a 36″ floating vanity. The homeowner: “I can’t believe how much bigger it looks. And it’s easier to clean underneath!”
Cost: $0 (removing items) to $800-$2,000 (floating vanity)
DIY difficulty: Easy to medium
Impact rating: 8/10 ⭐⭐⭐⭐⭐
Pro tip: Even 6 inches of visible floor under a floating vanity makes a significant visual difference.
Strategy #5: Ruthless Decluttering
The hard truth: Clutter makes small spaces feel chaotic and cramped.
The 80/20 rule for bathrooms:
You probably use 20% of your bathroom items 80% of the time. The rest? Hidden or removed.
What stays visible:
- Hand soap
- 1-2 daily skincare items
- 1 decorative element (plant, candle)
What gets hidden:
- Extra toiletries
- Hair tools
- Cleaning supplies
- Backup products
- Seasonal items
Storage solutions:
- Medicine cabinet with mirror front
- Drawer organizers (everything has a spot)
- Under-sink pullouts (maximize dead space)
- Shower caddy or built-in niche
The “hotel bathroom test”:
Walk into any high-end hotel bathroom. What do you see? Almost nothing on the counters. That’s the goal.
Cost: $0-$200 (storage organizers)
DIY difficulty: Easy
Impact rating: 6/10 ⭐⭐⭐
Pro tip: Take everything off your counters for one week. Only put back what you actually used. Donate or store the rest.
Part 2: Medium Investments ($500-$3,000)
These upgrades require some budget but deliver major impact.
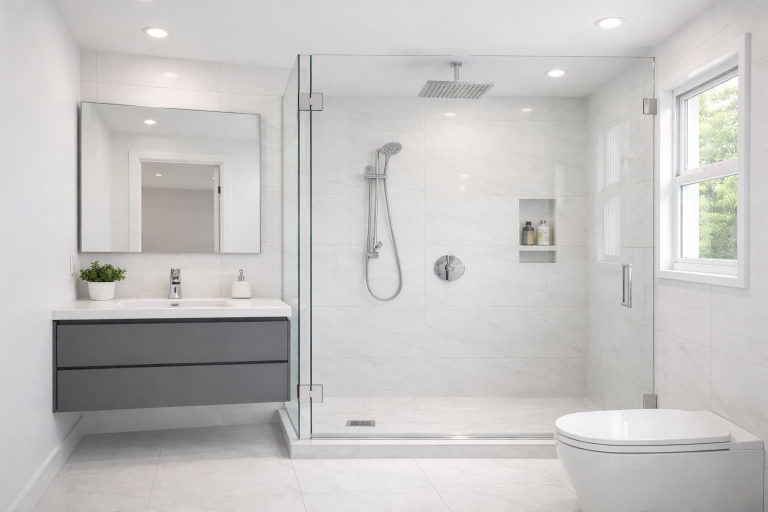
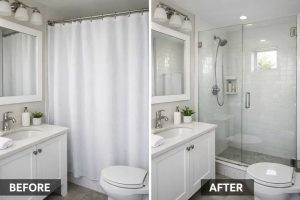
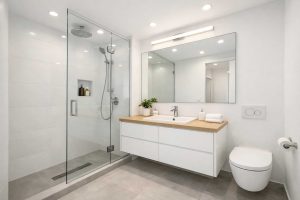
Strategy #6: Glass Shower Doors
The problem: Shower curtains or frosted doors create a visual barrier that cuts the room in half.
The solution: Clear glass doors or panels.
Why it works:
Your eye can see through the glass, making the entire bathroom feel like one unified space instead of two separate zones.
Options:
Frameless glass doors:
- Sleek, modern look
- Maximum transparency
- Most expensive
- Cost: $800-$1,500
Semi-frameless:
- Minimal frame
- Good balance of style and cost
- Cost: $500-$900
Framed (but clear glass):
- Budget-friendly
- Still much better than curtain
- Cost: $300-$600
What about privacy?
If you need privacy, use frosted glass only on the bottom 12-18 inches. Keep the top clear for openness.
Real example:
A Redmond couple replaced their shower curtain with frameless glass. The wife: “I didn’t realize how much that curtain was closing in the space. This is transformative.”
Cost: $300-$1,500
DIY difficulty: Medium-hard (best to hire)
Impact rating: 9/10 ⭐⭐⭐⭐⭐
Pro tip: Keep glass clean with a daily squeegee. Takes 30 seconds and prevents soap scum buildup.
Strategy #7: Strategic Use of Tile
The concept: How you tile can make the room feel longer, wider, or taller.
Make the room feel longer:
- Horizontal tile pattern
- Large format tiles (12″x24″ or 12″x48″)
- Fewer grout lines
Make the ceiling feel higher:
- Vertical tile pattern in shower
- Continue wall tile all the way to ceiling (not just 6 feet)
- Vertical subway tile
Make the room feel wider:
- Diagonal floor tile
- Large format floor tile
- Light grout lines (not dark)
The winning combination for most small bathrooms:
- Floor: 12″x24″ light gray tile, laid horizontally
- Shower walls: 12″x24″ tile, laid vertically to ceiling
- Other walls: Paint (lighter, easier, cheaper)
Tile size matters -Small tile (4×4 or smaller):
- Many grout lines = busy, chopped up look
- Makes space feel smaller
- More expensive to install
Large tile (12×24 or larger):
- Fewer grout lines = cleaner look
- Makes space feel larger
- Faster to install
Cost: $1,200-$3,000 (shower) | $800-$2,000 (floor)
DIY difficulty: Hard (hire a pro)
Impact rating: 7/10 ⭐⭐⭐⭐
Pro tip: Use the same tile on floor and shower walls for continuity. This makes both areas feel like part of one larger space.
Strategy #8: Scale Down Your Fixtures
The problem: Standard fixtures are designed for average-sized bathrooms. In small bathrooms, they’re out of proportion.
Smart swaps:
Toilet:
- Standard toilet depth: 28-30″
- Compact toilet depth: 24-26″
- Wall-hung toilet: Saves even more visual space
- Savings: 4-6 inches of floor space
Vanity:
- Standard depth: 21-24″
- Narrow vanity depth: 16-18″
- Pedestal sink: 12-14″ (if you don’t need storage)
- Savings: 5-8 inches of floor space
Sink:
- Standard sink: 20-22″ wide
- Compact sink: 16-18″ wide
- Corner sink: Maximizes awkward corners
- Savings: 4-6 inches of width
Real example:
In a 5×6 bathroom in Issaquah, we replaced:
30″ deep toilet → 25″ compact toilet
22″ deep vanity → 18″ floating vanity
Result: Gained 11 inches of floor space. “Now I can actually turn around comfortably!” – Homeowner
Cost: $200-$1,500 per fixture
DIY difficulty: Medium (plumbing required)
Impact rating: 8/10 ⭐⭐⭐⭐⭐
Pro tip: Measure your bathroom before shopping. Bring dimensions to the showroom and ask for compact options.
Strategy #9: Maximize Natural Light
If you have a window Make it bigger:
- Extend window to near-ceiling height
- Widen window if possible
- Cost: $1,000-$3,000
Remove obstacles:
- No curtains (use frosted film for privacy)
- No bulky window treatments
- Keep window sill clear
If you don’t have a window Create a faux window:
- LED light panel with nature scene
- Backlit frosted glass panel
- Cost: $200-$800
Add a skylight or sun tunnel:
- Brings natural light from above
- Works even in interior bathrooms
- Cost: $500-$2,500
The light matters:
Natural light (or the illusion of it) significantly impacts how spacious a room feels. Our brains associate natural light with openness.
Cost: $200-$3,000 depending on solution
DIY difficulty: Medium to hard
Impact rating: 8/10 ⭐⭐⭐⭐⭐
Pro tip: If you can’t add a window, add a very bright, color-accurate (CRI 90+) light fixture to mimic daylight.
Strategy #10: Rethink Your Door
The problem: Standard doors swing into the bathroom, taking up floor space.
Better options Pocket door:
- Slides into wall cavity
- Saves 9-10 square feet when open
- Cost: $600-$1,200 installed
- Best for: Remodels where you can open the wall
Barn door:
- Slides along wall
- Saves floor space
- Adds design element
- Cost: $300-$800
- Best for: Homes with farmhouse/modern style
Outswing door:
- Opens into hallway instead
- Saves bathroom floor space
- Cost: $200-$400 (just reverses existing door)
- Best for: When hallway has space
Smaller door:
- 24″ or 28″ instead of 30″ or 32″
- May not work for accessibility needs
- Cost: $150-$400
Real example:
A couple in Kirkland changed their inswing door to a pocket door. “We gained back the corner that the door always blocked. Now we can actually use that space!”
Cost: $150-$1,200
DIY difficulty: Medium to hard
Impact rating: 7/10 ⭐⭐⭐⭐
Pro tip: If doing a remodel, pocket door is almost always worth the extra $600. You’ll use that space daily for 20+ years.
Part 3: Major Upgrades ($3,000-$15,000)
These require professional help but completely transform the space.
Strategy #11: Ditch the Tub (Maybe)
The controversial one: In small bathrooms, tubs take up 15-20 square feet.
Do you actually use your tub?
Most adults don’t take baths regularly. If you’re not using it, it’s just taking up valuable space.
Replace with Spacious walk-in shower:
- 3’x4′ or 3’x5′
- Bench seating
- Rain showerhead
- Built-in niches
- Freed space: 5-10 square feet
- Cost: $5,000-$10,000
Walk-in shower + vanity expansion:
- Use extra space for double vanity
- Or add storage tower
- Cost: $6,000-$12,000
When to keep the tub:
- You have young children
- You regularly take baths
- It’s your only bathroom
- Resale concerns in your market
Real example:
A Bellevue couple with grown kids removed their unused tub and created a 4’x5′ walk-in shower with bench and rain head. They also added a 48″ double vanity.
“Best decision we made. We never used the tub, and now the bathroom feels luxurious instead of cramped.” – Homeowner
Cost: $5,000-$12,000 (shower) + $2,000-$4,000 (vanity)
DIY difficulty: Requires professionals
Impact rating: 9/10 ⭐⭐⭐⭐⭐
Pro tip: If worried about resale, check what other homes in your neighborhood have. If most have tub/shower combos in the master, keep yours.
Strategy #12: Reconfigure the Layout
When the layout is truly wrong:
Sometimes the biggest issue isn’t the size it’s how the space is arranged. If you’re considering a complete renovation, reconfiguring the layout can transform how the space functions.
Common problems:
- Door hits toilet or vanity
- Toilet too close to shower
- Vanity blocks natural light
- Wasted corners or odd spaces
The fix: Rearrange fixtures. Example layouts:
Original layout problem:
- Door swings in, hits vanity
- Toilet right next to door (awkward)
- Shower in far corner
Better layout:
- Pocket door (saves space)
- Toilet moved to side wall
- Shower/tub along back wall
- Vanity near window (better light)
- Result: Better flow, feels 30% larger
What this costs:
Moving plumbing: $2,000-$5,000
Moving electrical: $800-$2,000
New fixtures positioned: $1,500-$3,000
Total: $4,300-$10,000
Is it worth it?
If your bathroom is truly dysfunctional, yes. You’ll use this space multiple times daily for decades.
Real example:
A Sammamish bathroom had terrible flow. We moved the toilet to the side wall, creating space for a 42″ vanity and larger shower. Timeline: 5 weeks. Cost: $18,000 total remodel.
“It’s like we added 20 square feet even though we didn’t.” – Homeowner
Cost: $4,000-$10,000 (just reconfiguration)
DIY difficulty: Requires professionals
Impact rating: 10/10 ⭐⭐⭐⭐⭐
Pro tip: A good designer or contractor can show you 3D renderings of different layouts before you commit.
Strategy #13: Structural Changes
The biggest moves: These change the actual size of the bathroom.
Option 1: Steal space from adjacent closet
- Borrow 2-3 feet from bedroom closet
- Adds 10-15 square feet
- Cost: $3,000-$8,000
This approach is similar to planning home additions you’re strategically expanding your functional space within the existing footprint.
Option 2: Bump out exterior wall
- Add 2-3 feet to exterior dimension
- Requires foundation work
- Cost: $15,000-$35,000
Option 3: Combine half bath with nearby space
- Merge small bath with closet or hallway
- Creates proper full bath
- Cost: $8,000-$20,000
When it makes sense:
- You have adjacent space that’s underutilized
- Your bathroom is truly tiny (under 35 sq ft)
- You’re already doing major renovations
- You plan to stay in home 10+ years
Before making any structural changes, schedule a free consultation with our team to discuss feasibility, costs, and potential ROI for your specific situation.
When it doesn’t:
- You’d lose valuable closet/bedroom space
- Costs exceed value added
- You’re planning to move soon
Real example:
A Redmond couple borrowed 2.5 feet from their bedroom to expand their tiny bathroom from 35 sq ft to 50 sq ft. This allowed them to add a proper shower and vanity. Cost: $22,000 total remodel. Home value increase: $35,000.
Cost: $3,000-$35,000 depending on scope
DIY difficulty: Requires professionals
Impact rating: 10/10 ⭐⭐⭐⭐⭐ (if done right)
Pro tip: Get an appraisal opinion before doing structural changes. Make sure the investment makes financial sense.
Part 4: Design Psychology Tricks
These are the subtle touches that tie everything together.
Strategy #14: Create Visual Flow
The concept: When your eye travels smoothly through a space, it feels larger.
How to achieve this:
Continuous lines:
- Align vanity top with window sill height
- Run tile to ceiling (no stopping mid-wall)
- Match door/window trim throughout
Consistent materials:
- Same tile in shower and floor
- Same hardware finish on all fixtures
- Same style throughout (don’t mix modern + traditional)
Uninterrupted sightlines:
- Nothing blocks the view from door to back wall
- Mirrors positioned to extend views
- Clear glass shower (as mentioned earlier)
Example:
Imagine entering a bathroom where:
- Your eye immediately sees the back wall
- Tile flows continuously from floor into shower
- Mirror reflects the tile, doubling the perceived depth
- All fixtures are similar finish (chrome)
vs. a bathroom where:
- Shower curtain blocks view
- Different tile on floor vs. walls
- Mismatched fixtures
- Visual clutter everywhere
The first feels twice as large.
Cost: $0 (design principle)
DIY difficulty: Easy (just awareness)
Impact rating: 6/10 ⭐⭐⭐
Pro tip: Before remodeling, look at high-end bathroom photos. Notice how simple and uninterrupted everything is? That’s intentional.
Strategy #15: The “One Statement” Rule
The principle: Small spaces need ONE focal point, not multiple competing elements.
Choose ONE statement element:
Option A: Statement Tile
- Bold tile in shower
- Keep everything else neutral
- Example: White walls + vanity, blue zellige tile in shower
Option B: Statement Vanity
- Unique vanity (wood, color, design)
- Keep tile and walls simple
- Example: Natural wood floating vanity, white walls and tile
Option C: Statement Mirror
- Unique shaped or framed mirror
- Keep everything else minimal
- Example: Round brass mirror, white subway tile, simple vanity
Option D: Statement Lighting
- Dramatic light fixture
- Everything else subdued
- Example: Modern geometric sconce, white everything else
What doesn’t work:
- Statement tile + statement vanity + statement mirror + statement lights
- Too many colors or patterns
- Visual chaos that makes space feel small
Real example:
An Issaquah bathroom featured:
Stunning moroccan-style tile in the shower (statement element)
Everything else: white walls, gray floor, simple fixtures
Result: The tile becomes art, and the simplicity makes the room feel spacious.
Cost: $0 (design principle)
DIY difficulty: Easy (just discipline)
Impact rating: 5/10 ⭐⭐⭐
Pro tip: If you can’t decide, go all neutral. You can always add personality with towels, plants, and accessories.
The 5 Biggest Mistakes to Avoid
Before we wrap up, here’s what NOT to do. (For even more detail, check out our complete guide on common bathroom remodeling mistakes.)
❌ Mistake #1: Dark Colors Everywhere
The problem: Dark paint + dark tile + dark fixtures = cave
The fix: If you love dark colors, use them sparingly:
Dark accent wall (one wall only)
Dark floor with light walls
Dark fixtures with light surfaces
❌ Mistake #2: Too Much Storage Furniture
The problem: Floor-standing cabinets, shelves, and carts eat up visual space
The fix: Built-in storage only:
Medicine cabinet
Floating shelves (1-2 max)
Under-sink storage
Shower niches
❌ Mistake #3: Choosing the Wrong Tile Size
The problem: Small tile (smaller than 6″x6″) creates visual clutter
The fix: Use large format tile:
- Floor: 12″x24″ or larger
- Walls: 12″x24″ or subway (3″x6″)
- Fewer grout lines = cleaner look
❌ Mistake #4: Blocking Natural Light
The problem: Heavy curtains, frosted windows, or obstacles blocking light
The fix: Maximize every bit of natural light:
- Remove curtains (use frosted film for privacy)
- Clean windows
- Light colors near windows
❌ Mistake #5: Trying to Fit Everything
The problem: Cramming in tub + shower + double vanity + linen closet
The fix: Prioritize what you actually use:
- Need shower daily? Make it great.
- Never take baths? Skip the tub.
- Don’t need double vanity? Save the space.
The Bottom Line: It’s Not About Size
After remodeling 150+ small bathrooms, here’s what I know for sure:
A well-designed 40 square foot bathroom feels larger than a poorly designed 60 square foot bathroom.
Size helps, but design matters more.
The strategies in this guide work because they address how we perceive space:
- ✅ Light makes spaces feel open
- ✅ Clear sightlines make spaces feel larger
- ✅ Continuity makes spaces feel cohesive
- ✅ Proper scale makes spaces feel right
You don’t need to do everything on this list.
Even implementing 3-5 strategies will make a noticeable difference.
Don’t just take our word for it see what our clients say about their bathroom transformations in our reviews.
Ready to Transform Your Small Bathroom?
Whether you’re planning ,we can help.
📞 Call us: 425.416.0017
📧 Email us: home@areseattle.com
🗓️ Schedule a free consultation
What You’ll Get (No Cost, No Obligation):
✅ Free in-home bathroom assessment
✅ Professional space planning advice
✅ Custom recommendations for your specific bathroom
✅ Detailed estimate if you want to proceed
✅ Examples of similar small bathroom transformations
✅ Honest answers about what will (and won’t) work
Our Small Bathroom Expertise:
- 150+ small bathroom remodels completed
- Specialists in maximizing tight spaces
- Licensed, bonded, and insured
- Written warranty on all work
- Transparent pricing (no surprises)
- Average project: 3-5 weeks
We’ve helped homeowners transform:
Tiny 1960s bathrooms into modern spa spaces
Awkward layouts into functional designs
Dark, cramped bathrooms into bright, open rooms
Let us show you what’s possible in your space.
Frequently Asked Questions
Q: What’s the minimum budget for a noticeable improvement?
A: $200-$500 for DIY changes (mirror, lighting, paint, declutter) will make a real difference. Full remodels start at $8,000-$10,000.
Q: Can you make a 5×5 bathroom work?
A: Yes! We’ve done beautiful 25 sq ft bathrooms. The key is using every inch efficiently and choosing the right fixtures.
Q: Should I keep my bathtub for resale value?
A: It depends. If it’s your only bathroom, keep it. If you have another bathroom with a tub, you can convert this one to a shower. Check comparable homes in your area.
Q: What’s the #1 thing that makes the biggest difference?
A: Clear glass shower doors (if you have a shower). It’s the single most impactful change for visual spaciousness.
Q: How long does a small bathroom remodel take?
A: 3-5 weeks for most projects. Simple refreshes (no layout changes): 2-3 weeks. Complex remodels: 5-7 weeks.
Q: Can I DIY any of this?
A: Yes! Painting, decluttering, hanging mirrors, and replacing light fixtures are all DIY-friendly. Tile, plumbing, and electrical should be done by professionals.
Q: Will a small bathroom remodel add value to my home?
A: Yes. Bathroom remodels typically return 60-80% of cost at resale. A well-done small bathroom can add $10,000-$20,000 to home value.
Q: What if my bathroom is oddly shaped?
A: That’s our specialty! Odd shapes often have hidden potential. We’ve turned triangular, L-shaped, and pie-shaped bathrooms into functional spaces.